Trying to Stay Busy and Warm? These (Post-)Valentine’s and St. Patrick’s Day Projects Are Just What You’ve Been Looking For
Trying to Stay Busy and Warm? These (Post-)Valentine’s and St. Patrick’s Day Projects Are Just What You’ve Been Looking For
By Jess Galvan
Local Artist, Creator & Goodwill Décor Genius
Editor’s Note: We are positively thrilled to welcome Jessica Galvan as our guest blogger and influencer! We intended to post this before Valentine’s Day, but we blew it. However, with the severe cold and kiddos at home, you might be looking for a project to keep them busy. And you can make one in plenty of time for St. Patrick’s Day!
If you like people to look at you with pure confusion, tell the cashier at Goodwill that you’re buying one green plaid shirt, some books and one striped curtain for holiday decor. Then explain that, no, you didn’t mean to say a costume.
Hi, I’m Jessica Galvan. Everyone calls me Jess, and I’m used to the confused looks when people make small talk and ask what I’m buying random things for.
Like a lot of people, I grew up in a home without any “disposable income”— and with grandparents who lived through the Depression. That means a few things.
First, if you got something new, you saved it. You used it for its intended purpose and after that, if there was a way to use it for another purpose, you did it.
Second, one man’s trash is another’s man’s treasure. But let’s be real: Sometimes one man’s trash is just trash. I’m not going to reuse lightbulbs. (Although, I will straight-up wash and dry a freezer bag. What can I say; my grandma was right about that one.)
And, third, I don’t care if something is eight days old or 80 years old, with elbow grease, a few supplies, and some ingenuity, you can make what you have into something you love. I’ve spent my whole life doing that. Now, I get to help other people do that every day.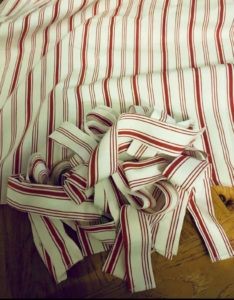
OK! I will stop talking about myself now, a full intro is boring, and, as time goes by, I’ll probably overshare details, so I’m going to issue my apologies for that in advance.
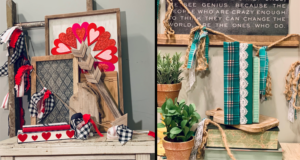
How To Make a Festive Vignette
We’re going to start with a fun and totally customizable Valentine’s Day vignette using some supplies most of us have at home and those items from Goodwill that I talked about earlier. We’ll make a holiday garland and books to coordinate with our holiday for this Valentine’s Day and St. Patrick’s Day.
Like I said, this is customizable, so before you go buy anything, look around your house! That cute patterned shirt the kids outgrew, the tablecloth you used once because it’s easier to just wipe the table than to wash the cloth and still have to wipe the table. ANYTHING that has the color scheme you want. Remember also that you can use that red glitter or buffalo check from Christmas for Valentine’s. The cute lime green floral picks from Christmas can be used for St. Pat’s or even Easter.
Here’s a list of the supplies I used:
- Twine or string
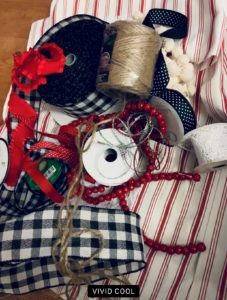
- Ribbon, lace, embellishments (buttons, stickers, etc.)
- Plaid shirt in specific color (49¢ at Goodwill)
- Striped curtain (99¢ at Goodwill)
- Hardcover and softcover books (99¢ at Goodwill)
- Craft paint
- White glue or Mod Podge
To make the garland:
- Cut string or twine to fit the intended spot where you’ll hang the garland. I usually decorate my mantle, so I use about 8 ft. In this case, my husband was watching TV, so I made do by making a table for photos.
- Cut fabric (shirts, curtains, etc.) and ribbons into strips and to desired length. The shorter the length, the puffier they’ll be.
Tip: You can use one color or pattern, or seven; it’s all about what you want your project to be. I typically start with four strips. - Approximately every 6 to 8 inches, tie the strips into knots onto the twine. If you feel like the strips are too long, you can trim them.
- Add more strips if it seems too sparse, and snip some off if it’s too full.
That’s. It. It’s super easy and fast. I use 3M strips to hang mine — they don’t mess finishes or paint, and I’m not putting nails in whatever I decorate.
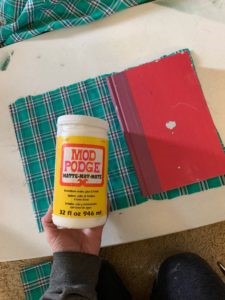
To make the books:
Forewarning: If you don’t like messy hands, you’re going to want to wear gloves or get a helper for this. I like to use whichever kid has annoyed me the most that day.
- Grab some of the same fabric you used for the garland. Measure the approximate size to book — just like the good old days when we used books for school and had to put book covers on them! So, allow about an inch beyond the edges of the cover on all sides.
- Apply white glue or Mod Podge to fabric with a paintbrush or roller, then roll it onto one side of the book.
- Using your hands, smooth the fabric on the side of the book you put glue on. Open the cover and apply glue to about 1 inch of the three sides, then fold and smooth any excess fabric. Close the book cover, roll glue onto the fabric and book and smooth the fabric on the spine of book, fold the edge over and tuck it under to hide excess fabric. This can be trimmed later, if necessary, so don’t stress if it won’t tuck!
- Repeat on the back and the inside cover.
- Leave to dry, making sure the book is on plastic or something smooth and hard so it won’t stick to whatever it’s sitting on. I’ve found it’s easiest to put the book spine-up with only the cover edges down.

On the other books, I used some ribbon and lace from the garland, some craft paint, and felt hearts. Paint right over the letters, or paint the whole book! You can even add buttons, stickers, stamps or washi tape.
Now, the two parts are all done and it’s time to put them together! Hunt for things from around your house (or that Goodwill trip) and decorate the space to create your perfect vignette.
If you have a project you want to try, a piece of furniture that needs new life or want to recreate something you saw on Pinterest or TV, let me know! We’re just getting started here so, don’t be shy!
Reach out and connect with me!
Instagram: jessgalvan8
TikTok: @jessgalvan8
Facebook: Jessica Galvan